> ## Documentation Index
> Fetch the complete documentation index at: https://arizeai-433a7140.mintlify.site/llms.txt
> Use this file to discover all available pages before exploring further.
# MCP Servers
> Connect AI assistants to Phoenix documentation and platform capabilities via the Model Context Protocol (MCP).
Phoenix provides two MCP servers for AI assistants:
* **Phoenix Docs MCP** - Search Phoenix documentation in real-time
* **Phoenix MCP Server** - Work directly with Phoenix projects, traces, sessions, prompts, datasets, experiments, and annotations
***
## Phoenix Docs MCP
The Phoenix Docs MCP server allows AI assistants to search and retrieve Phoenix documentation in real-time.
**Server URL:**
```
https://arizeai-433a7140.mintlify.app/mcp
```
### Connect with Claude Code
```bash theme={null}
# Project scope (current directory only)
claude mcp add --transport http phoenix-docs https://arizeai-433a7140.mintlify.app/mcp
```
To add the MCP server globally and access it in all projects, add the `--scope user` flag:
```bash theme={null}
claude mcp add --transport http phoenix-docs --scope user https://arizeai-433a7140.mintlify.app/mcp
```
### Connect with Cursor or VS Code
Add the following to your MCP settings configuration file:
```json theme={null}
{
"mcpServers": {
"phoenix-docs": {
"url": "https://arizeai-433a7140.mintlify.app/mcp"
}
}
}
```
### Connect with Claude Desktop
1. Open Claude Desktop
2. Go to Settings > Connectors
3. Add the MCP server URL: `https://arizeai-433a7140.mintlify.app/mcp`
***
## Phoenix MCP Server
The Phoenix MCP Server (`@arizeai/phoenix-mcp`) connects AI assistants directly to your Phoenix instance for managing:
* **Projects, Traces, and Spans**: Explore recent traces, inspect spans, and analyze annotations
* **Sessions**: Review conversation flows and session annotations
* **Annotation Configs**: Inspect the available labeling and scoring configs in Phoenix
* **Prompts Management**: Create, list, update, and iterate on prompts
* **Datasets**: Explore datasets and synthesize new examples
* **Experiments**: Pull experiment results and visualize them with the help of an LLM
### Connecting the Phoenix MCP Server
#### Via Cursor Deeplink:
[Add to Cursor](https://cursor.com/install-mcp?name=phoenix\&config=eyJjb21tYW5kIjoibnB4IC15IEBhcml6ZWFpL3Bob2VuaXgtbWNwQGxhdGVzdCAtLWJhc2VVcmwgaHR0cHM6Ly9hcHAucGhvZW5peC5hcml6ZS5jb20gLS1hcGlLZXkgIn0%3D)
#### Manually:
From the Cursor Settings page, navigate to the MCP section, and click "Add new global MCP server"
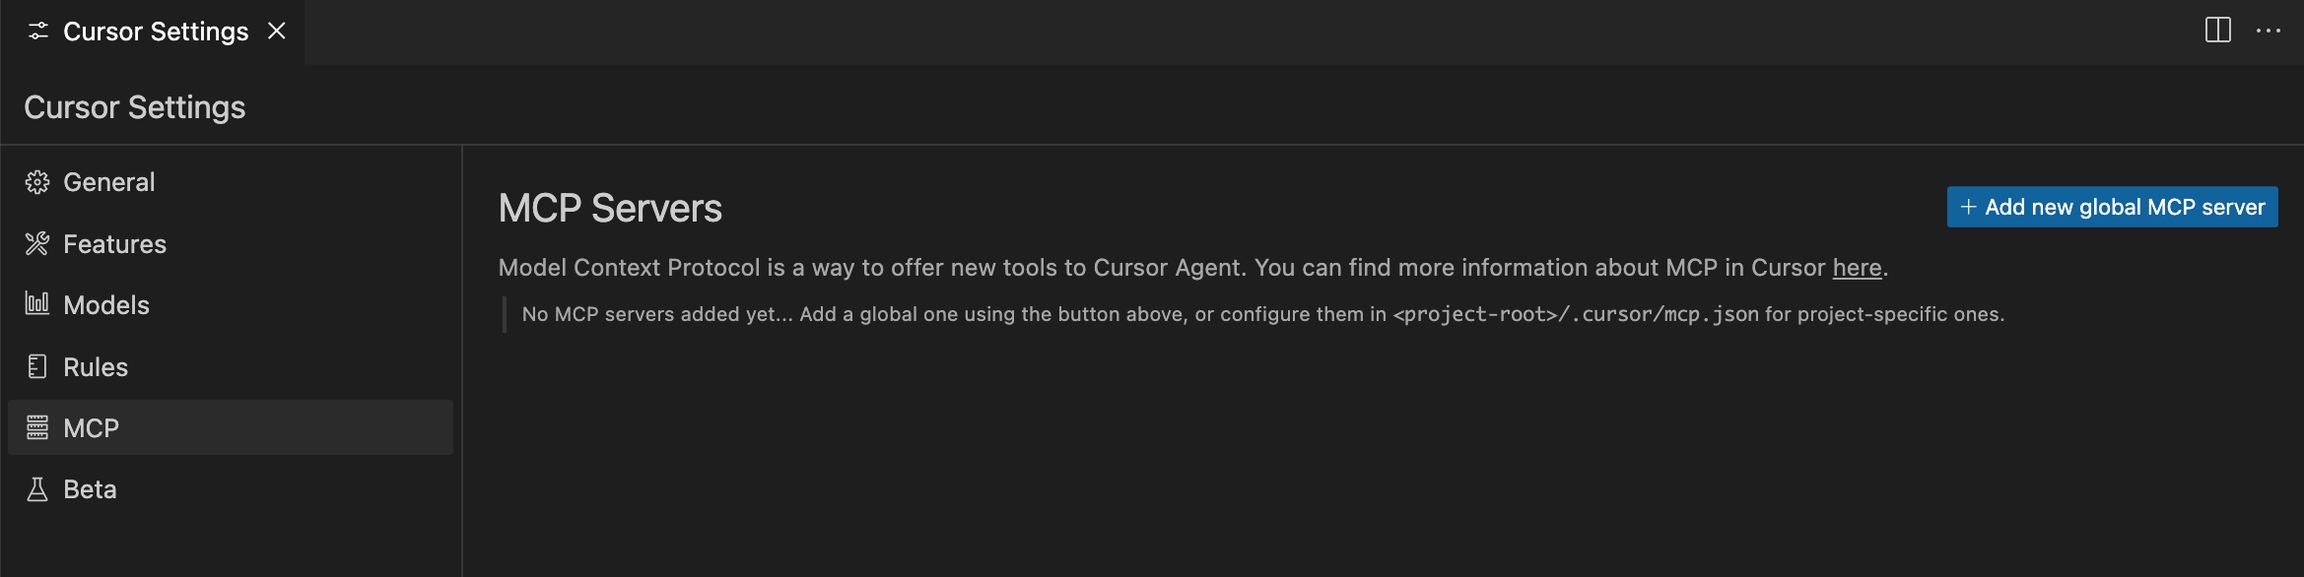 Add the following code to your MCP config file:
```json theme={null}
{
"mcpServers": {
"phoenix": {
"command": "npx",
"args": [
"-y",
"@arizeai/phoenix-mcp@latest",
"--baseUrl",
"https://my-phoenix.com",
"--apiKey",
"your-api-key"
]
}
}
```
Replacing:
* [https://my-phoenix.com](https://my-phoenix.com) with your Phoenix collector endpoint
* `your-api-key` with your Phoenix API key
After saving your config file, you should see the Phoenix server enabled:
Add the following code to your MCP config file:
```json theme={null}
{
"mcpServers": {
"phoenix": {
"command": "npx",
"args": [
"-y",
"@arizeai/phoenix-mcp@latest",
"--baseUrl",
"https://my-phoenix.com",
"--apiKey",
"your-api-key"
]
}
}
```
Replacing:
* [https://my-phoenix.com](https://my-phoenix.com) with your Phoenix collector endpoint
* `your-api-key` with your Phoenix API key
After saving your config file, you should see the Phoenix server enabled:
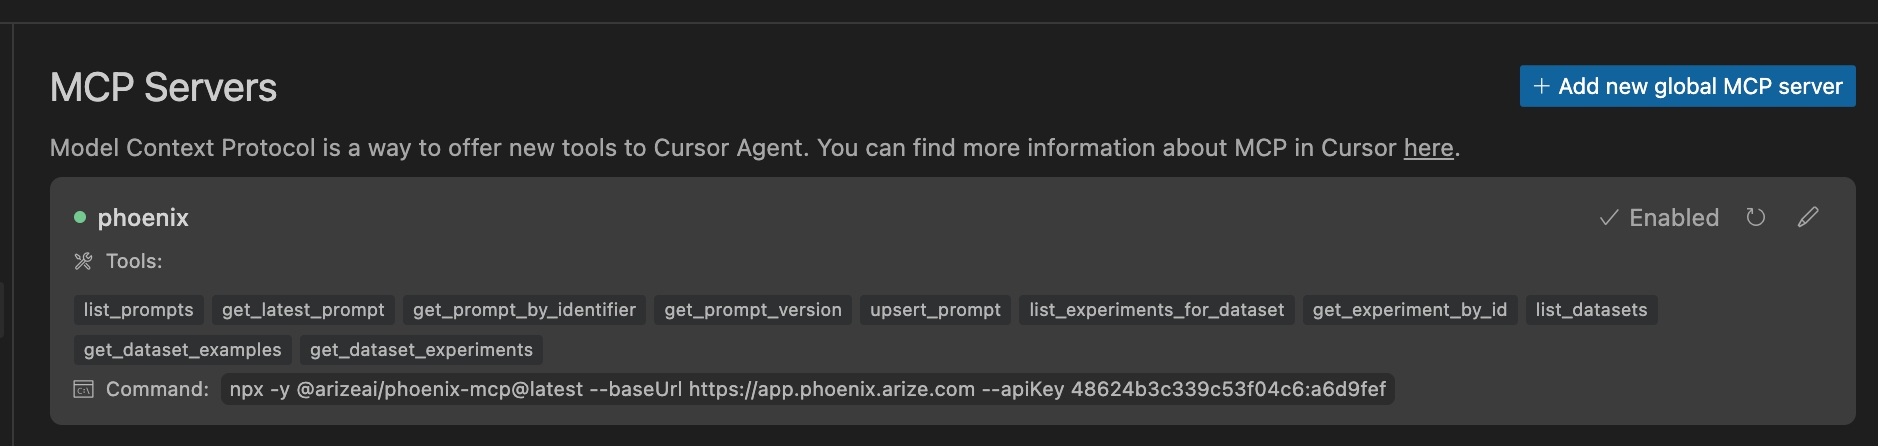 You can access Phoenix prompts, experiments, and datasets through Cursor!
From the Claude Desktop settings window, navigate to the Developer Section, and click "Edit Config"
You can access Phoenix prompts, experiments, and datasets through Cursor!
From the Claude Desktop settings window, navigate to the Developer Section, and click "Edit Config"
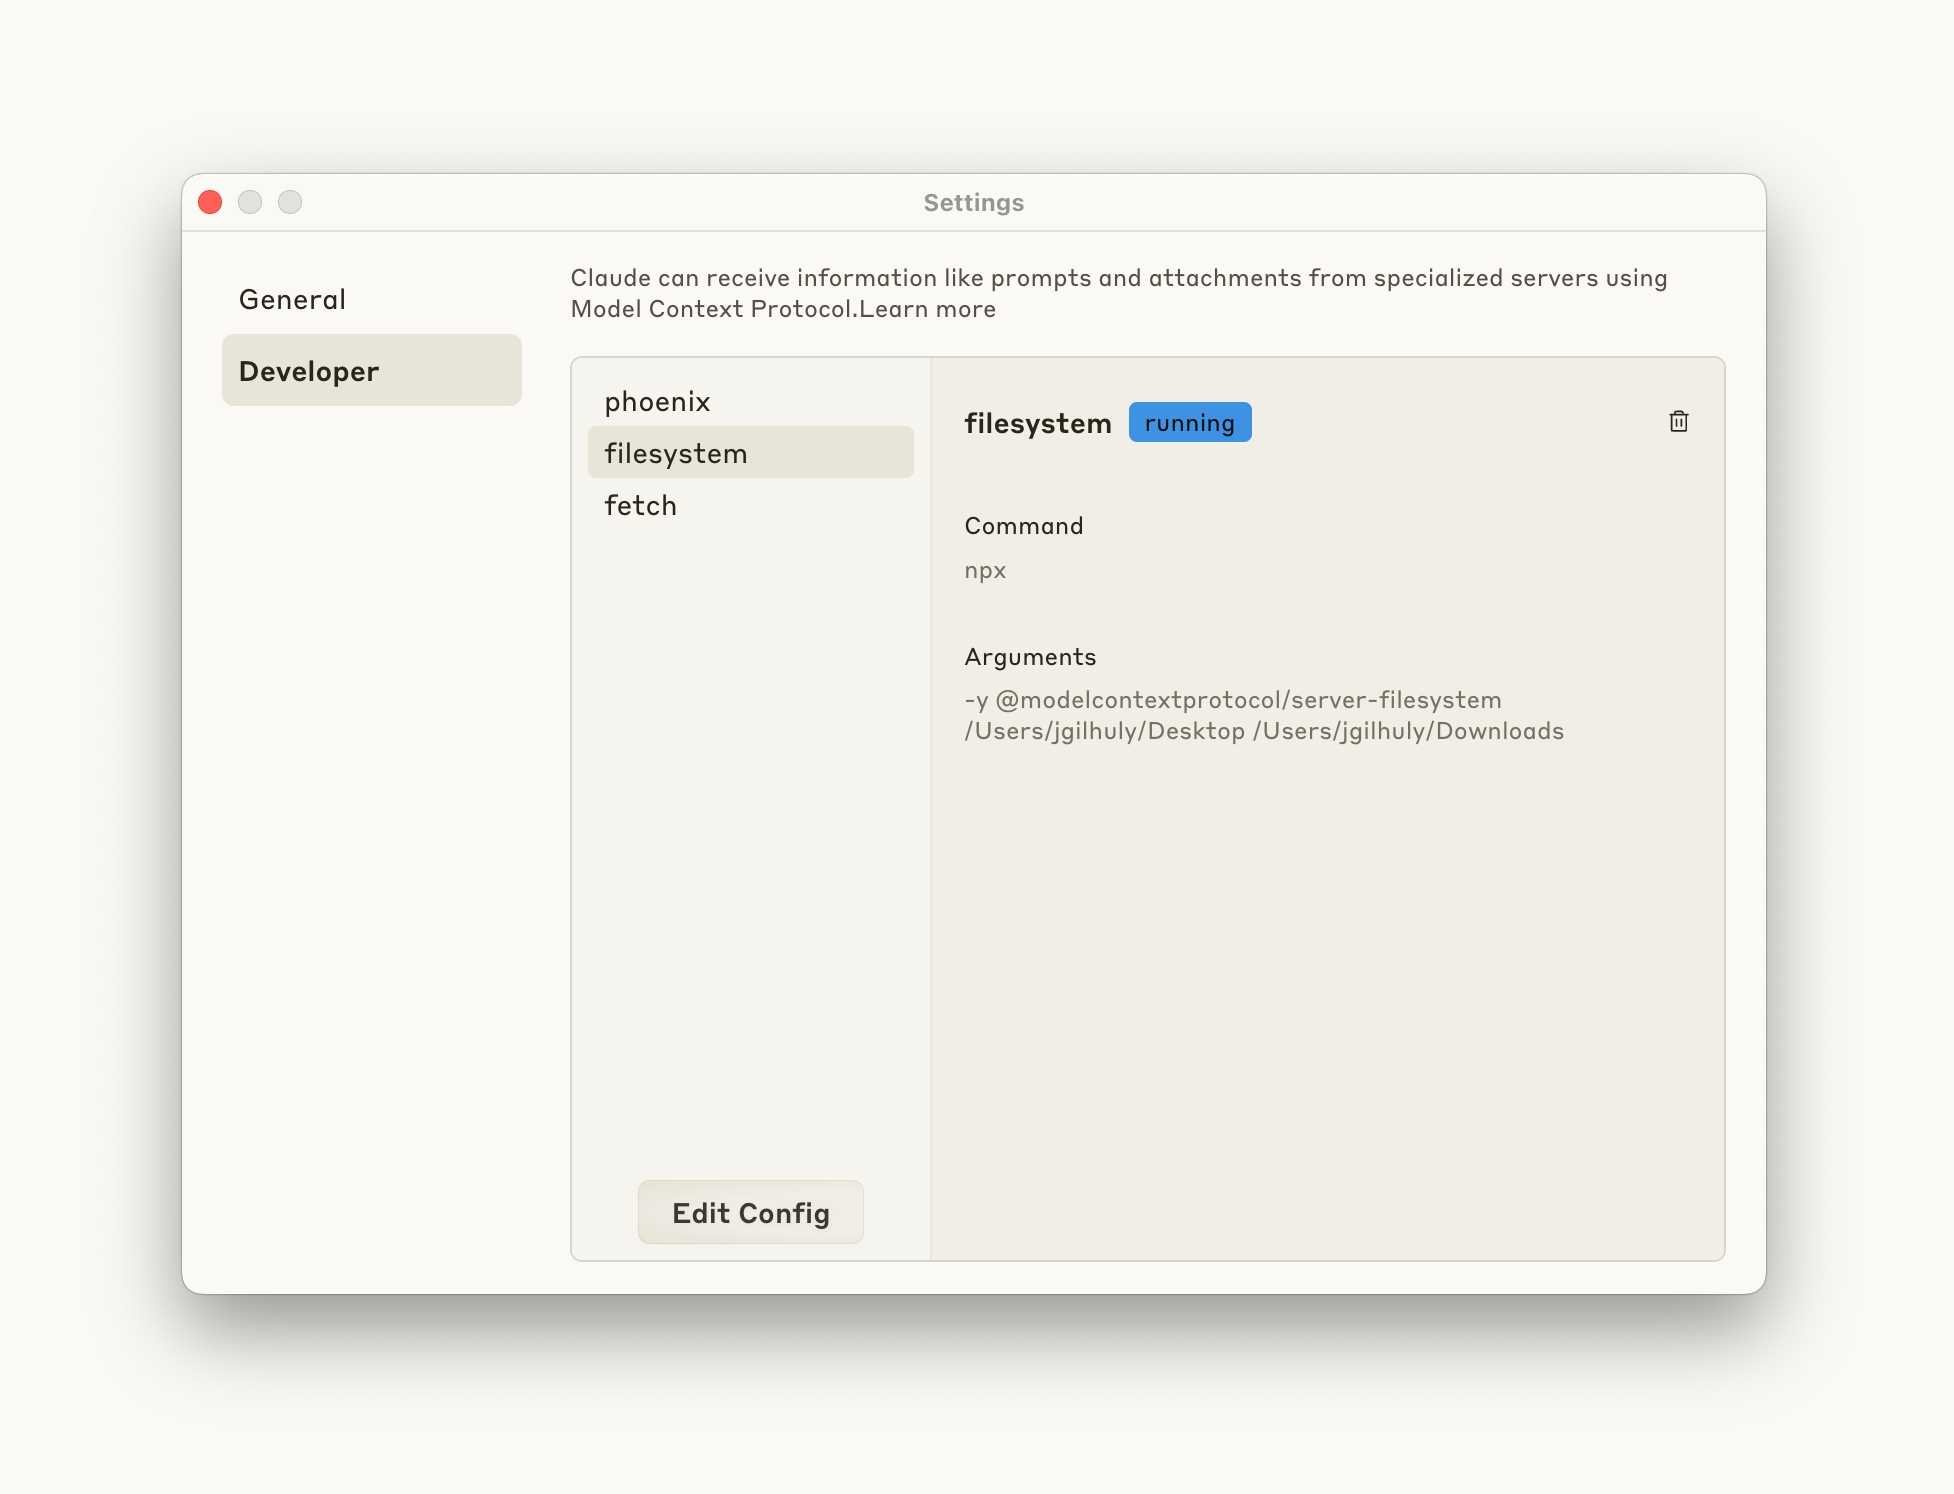 Open your config file and add the following code:
```json theme={null}
{
"mcpServers": {
"phoenix": {
"command": "npx",
"args": [
"-y",
"@arizeai/phoenix-mcp@latest",
"--baseUrl",
"https://my-phoenix.com",
"--apiKey",
"your-api-key"
]
}
}
```
Replacing:
* [https://my-phoenix.com](https://my-phoenix.com) with your Phoenix collector endpoint
* `your-api-key` with your Phoenix API key
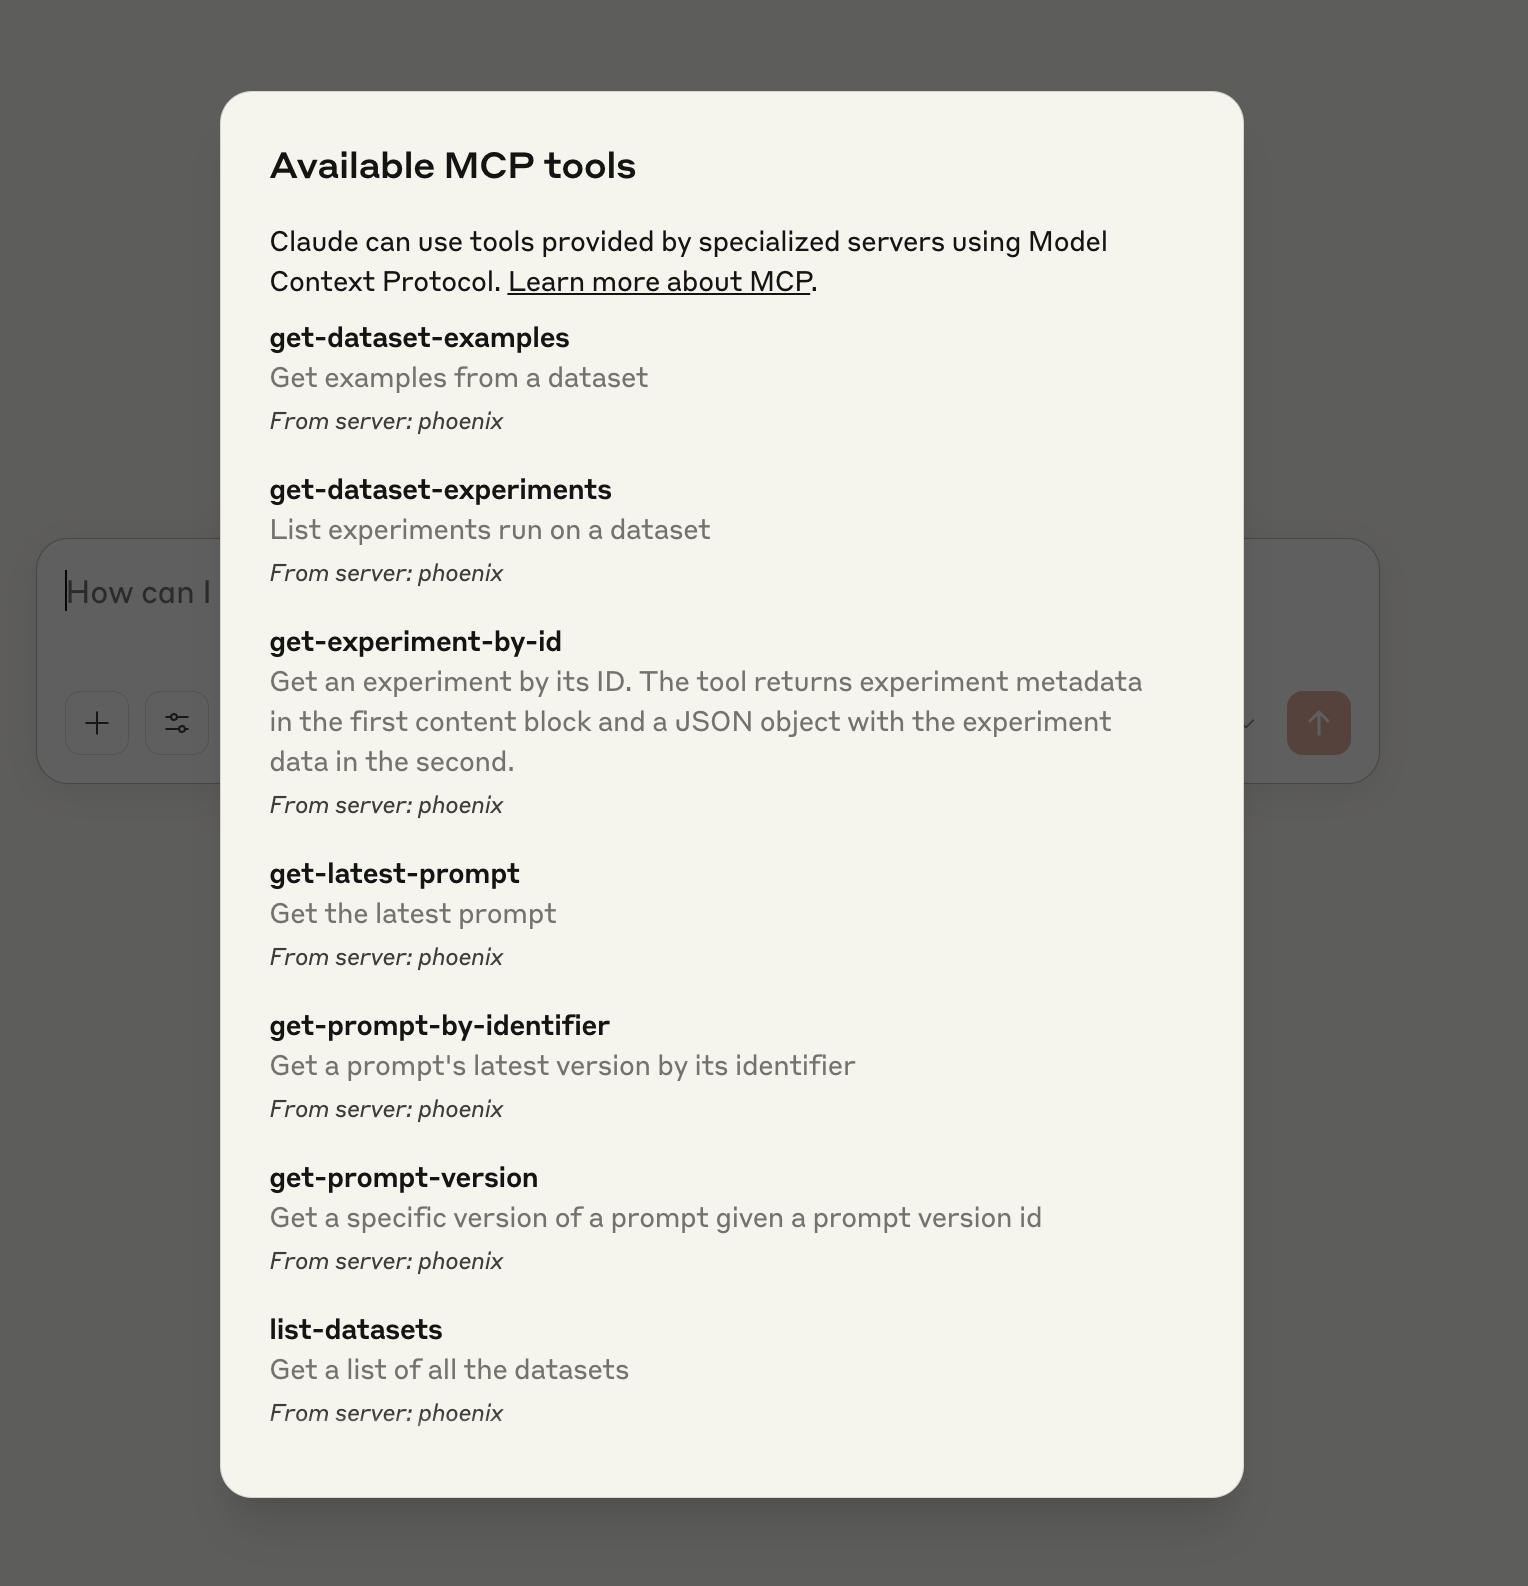
Save your file and relaunch Claude Desktop. You should now see your new tools ready for use in Claude!
Open your config file and add the following code:
```json theme={null}
{
"mcpServers": {
"phoenix": {
"command": "npx",
"args": [
"-y",
"@arizeai/phoenix-mcp@latest",
"--baseUrl",
"https://my-phoenix.com",
"--apiKey",
"your-api-key"
]
}
}
```
Replacing:
* [https://my-phoenix.com](https://my-phoenix.com) with your Phoenix collector endpoint
* `your-api-key` with your Phoenix API key
Save your file and relaunch Claude Desktop. You should now see your new tools ready for use in Claude!
 Add the following code to your MCP config file:
```json theme={null}
{
"mcpServers": {
"phoenix": {
"command": "npx",
"args": [
"-y",
"@arizeai/phoenix-mcp@latest",
"--baseUrl",
"https://my-phoenix.com",
"--apiKey",
"your-api-key"
]
}
}
```
Replacing:
* [https://my-phoenix.com](https://my-phoenix.com) with your Phoenix collector endpoint
* `your-api-key` with your Phoenix API key
```bash theme={null}
claude mcp add phoenix -- npx -y @arizeai/phoenix-mcp@latest \
--baseUrl https://my-phoenix.com \
--apiKey your-api-key
```
Replacing:
* [https://my-phoenix.com](https://my-phoenix.com) with your Phoenix collector endpoint ([https://app.phoenix.arize.com](https://app.phoenix.arize.com) default for Phoenix Cloud)
* `your-api-key` with your Phoenix API key
After installation, restart your Claude Code CLI session to start using the Phoenix MCP tools.
### Using the Phoenix MCP Server
The MCP server can be used to interact with projects, traces, spans, sessions, annotation configs, prompts, experiments, and datasets. It can retrieve operational data, inspect prompt and experiment artifacts, and perform the existing prompt and dataset write flows.
Some good questions to try:
1. `Show me the latest traces in my default Phoenix project`
2. `Show me the last 10 sessions in my support-agent project`
3. `What annotation configs do I have in Phoenix?`
4. `What prompts do I have in Phoenix?`
5. `Create a new prompt in Phoenix that classifies user intent`
6. `Summarize the Phoenix experiments run on my agent inputs dataset`
7. `Visualize the results of my jailbreak dataset experiments in Phoenix`
### Hoping to see additional functionality?
`@arizeai/phoenix-mcp` is [open-source](https://github.com/Arize-ai/phoenix)! Issues and PRs welcome.
Add the following code to your MCP config file:
```json theme={null}
{
"mcpServers": {
"phoenix": {
"command": "npx",
"args": [
"-y",
"@arizeai/phoenix-mcp@latest",
"--baseUrl",
"https://my-phoenix.com",
"--apiKey",
"your-api-key"
]
}
}
```
Replacing:
* [https://my-phoenix.com](https://my-phoenix.com) with your Phoenix collector endpoint
* `your-api-key` with your Phoenix API key
```bash theme={null}
claude mcp add phoenix -- npx -y @arizeai/phoenix-mcp@latest \
--baseUrl https://my-phoenix.com \
--apiKey your-api-key
```
Replacing:
* [https://my-phoenix.com](https://my-phoenix.com) with your Phoenix collector endpoint ([https://app.phoenix.arize.com](https://app.phoenix.arize.com) default for Phoenix Cloud)
* `your-api-key` with your Phoenix API key
After installation, restart your Claude Code CLI session to start using the Phoenix MCP tools.
### Using the Phoenix MCP Server
The MCP server can be used to interact with projects, traces, spans, sessions, annotation configs, prompts, experiments, and datasets. It can retrieve operational data, inspect prompt and experiment artifacts, and perform the existing prompt and dataset write flows.
Some good questions to try:
1. `Show me the latest traces in my default Phoenix project`
2. `Show me the last 10 sessions in my support-agent project`
3. `What annotation configs do I have in Phoenix?`
4. `What prompts do I have in Phoenix?`
5. `Create a new prompt in Phoenix that classifies user intent`
6. `Summarize the Phoenix experiments run on my agent inputs dataset`
7. `Visualize the results of my jailbreak dataset experiments in Phoenix`
### Hoping to see additional functionality?
`@arizeai/phoenix-mcp` is [open-source](https://github.com/Arize-ai/phoenix)! Issues and PRs welcome.